SKU: 72205178094
black flower seed mix

black flower seed mix Beneficial Bug Wildflower Seed Mix

Sale price$20.98 Regular price$23.31
Save 10%

Pay in installments of $5.83 with ShopPay, AfterPay and Klarna

Shipping Estimate
USA
  • USA
  • CAN

Ships within 48 hours · Estimated delivery Sep 26 - Oct 1

Promo Codes Available:

For Your Every Summer RSVP, with Code: SUMMER15

Description

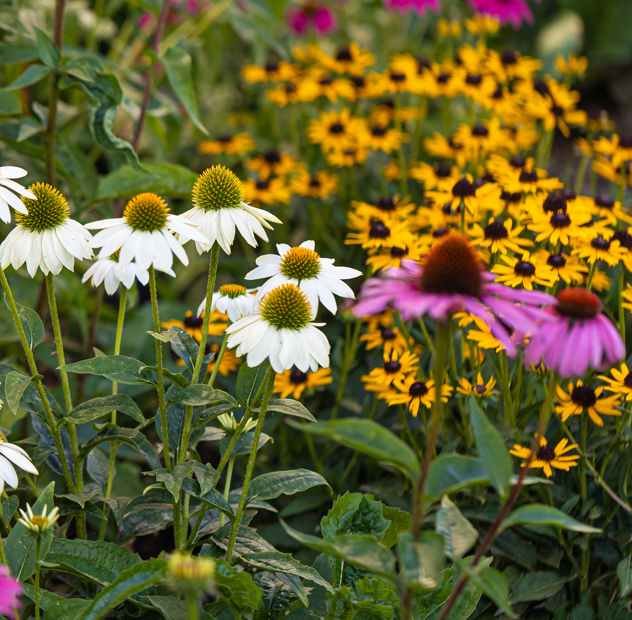
black flower seed mix Beneficial Bug Wildflower Seed MixBeneficial Bug Wildflower Seed Mixture attracts beneficial insects to the garden. Beneficial insects include lacewings, lady beetles, hoverflies, syrphid flies and parasitic wasps. These beneficial insects help to destroy harmful garden pests, such as aphids, thrips and mites. This wildflower seed mixture is also beautiful around your garden or landscaping!~~~ Beneficial Bug Wildflower Seed Mixture attracts beneficial insects to the garden. Beneficial

Beneficial Bug Wildflower Seed Mixture attracts beneficial insects to the garden. Beneficial insects include lacewings, lady beetles, hoverflies, syrphid flies and parasitic wasps. These beneficial insects help to destroy harmful garden pests, such as aphids, thrips and mites. This wildflower seed mixture is also beautiful around your garden or landscaping!~~~

Beneficial Bug Wildflower Seed Mixture attracts beneficial insects to the garden. Beneficial insects include lacewings, lady beetles, hoverflies, syrphid flies and parasitic wasps. These beneficial insects help to destroy harmful garden pests, such as aphids, thrips and mites. This wildflower seed mixture is also beautiful around your garden or landscaping!

Product Information

  • Application or Use: Ornamental, Lawn, Cover Crop, Erosion Control
  • Germination Time: 14 - 21 days, under optimal conditions
  • Growing Locations: Warm Season, Transition Zone, Cool Season
  • Height: 2 - 4 feet
  • Sunlight Requirements: 8+ hours, full sun for best results
  • Advantages: Attracts beneficial insects to garden to help destroy harmful garden pests.
  • When to Plant: See Instructions Tab.


Mix contents:

  • Purple Coneflower
  • Dwarf Blue Bachelor Buttons
  • Calendula
  • Baby's Breath
  • Siberian Wallflower
  • Lanceleaf Coreopsis
  • California Poppy
  • Shasta Daisy
  • Clasping Coneflower
  • Crimson Clover
  • Partridge Pea
  • Marsh Blazingstar

This mix may vary depending on harvest and availability.

*Product packaging may appear different than what is pictured. 

This mix is non-GMO. 

~~~

Wildflower Planting Time Based on Region:

Southeast

  • Fall, Winter: Sowing wildflowers in Fall/Winter is the ideal time in the Southeast, with October 1 – December 31 being the best dates. The weather is ideal for starting seeds, and seedlings can grow and harden off before frost.
  • Spring: A good time to plant wildflowers, especially annual species that flower quickly. Plant after the last frost date when soil temperatures have warmed to around 55°F, typically occurring within a month or so after the final frost of winter; this ensures the seeds can germinate properly without being affected by cold weather.
  • Summer: You can plant wildflower seeds in the summer, but the hot sun can dry out the soil and stress your seedlings. Summer is a good time to plant quick-growing annual wildflowers.


Southwest

  • Fall: A good time to plant spring wildflowers in the desert Southwest. Fall's cooler temperatures and seasonal rains help seeds germinate. In the mountains, you can plant after spring frosts.
  • Winter: In areas that get snow, winter seeding can give seeds an advantage in the spring. 
  • Spring: A popular time to plant wildflowers in most states. You can plant after the last frost and when the soil temperature is at least 55°F. In warmer climates, you can plant at the end of the rainy season.
  • Summer: You can plant wildflower seeds in the summer, but the hot sun can dry out the soil and stress your seedlings. Summer is a good time to plant quick-growing annual wildflowers.


Northeast

  • Fall, Winter: The best time to plant wildflowers in the Northeast is in late fall, after the first frost but before heavy snow. This is known as dormant seeding and can take place from November to December. Cold temperatures and damp soil during the winter help wildflower seeds germinate. 
  • Spring: Plant in early spring, after the ground has thawed and soil temperatures reach around 55-65°F. This is a popular time to plant wildflowers because it's typically rainier, which helps water seedlings. 
  • Summer: You can plant wildflower seeds in the summer, but the hot sun can dry out the soil and stress your seedlings. Summer is a good time to plant quick-growing annual wildflowers.


Midwest

  • Fall, Winter: Plant in late fall (November–December) after the first frost. The seeds will overwinter and germinate in the spring. Fall planting is a good option for cooler climates and can give the seeds an early start in the spring. 
  • Spring: Plant in early spring (April–May) after the last frost when the soil temperature is consistently above 55°F. Spring is a popular time to plant because the soil is usually moist from rain, and you can see the wildflowers grow right away.
  • Summer: You can plant wildflower seeds in the summer, but the hot sun can dry out the soil and stress your seedlings. Summer is a good time to plant quick-growing annual wildflowers.


Western

  • Fall, Winter: Plant in late fall (November–December) after the first frost. The seeds will overwinter and germinate in the spring. Fall planting is a good option for cooler climates and can give the seeds an early start in the spring. 
  • Spring: Plant in early spring (April–May) after the last frost when the soil temperature is consistently above 55°F. Spring is a popular time to plant because the soil is usually moist from rain, and you can see the wildflowers grow right away.
  • Summer: You can plant wildflower seeds in the summer, but the hot sun can dry out the soil and stress your seedlings. Summer is a good time to plant quick-growing annual wildflowers.


Pacific Northwest

  • Fall, Winter: Plant in late fall (November–December) after the first frost. The seeds will overwinter and germinate in the spring. Fall planting is a good option for cooler climates and can give the seeds an early start in the spring. 
  • Spring: Plant in early spring (April–May) after the last frost when the soil temperature is consistently above 55°F. Spring is a popular time to plant because the soil is usually moist from rain, and you can see the wildflowers grow right away.
  • Summer: In cooler zones with higher elevation, you can plant wildflowers in late spring to early summer, after the risk of frost has passed. You can plant wildflower seeds in the summer, but the hot sun can dry out the soil and stress your seedlings. Summer is a good time to plant quick-growing annual wildflowers.


Instructions:

Please note that each planting rate per acre is shown as a range.  Use the higher planting rate for maximum color, when adequate soil preparation and weed control are not possible, or if using a hydroseeder for planting.  The lower planting rate is suitable for broadcast and drill seeding methods.


Shipping Notes
  • Free Standard Shipping on $100+ Orders to the USA.
  • Except Preorder products are shipped in 48 hours.
  • Delivery to the USA:
  1. Standard Shipping : 3-10 business days
  • If time is of the essence, please consider selecting expedited delivery for faster service.
Exchange/Return Notes
  • We offer a 30-day return/exchange service after receiving.
  • Final sale items are not eligible for returns or exchanges.
  • To process your return/exchange, please contact us at [email protected]
  • Please click here for more details>>> Return & Exchange Policy
SKU: 72205178094

Discover Niche Categories That Outsell black flower seed mix

Top-Converting Item to Boost Your Average Order

4.1 ★★★★★
Based on 25 reviews
Sort
Highest Rating
Newest First
Oldest First
Product Reviews
T
Verified Purchase
Tural Farziev
Lowell, US
★★★★★ 5
Perfect
Size: 1 Count (Pack of 1), Size: 1 Count (Pack of 1)
Honestly one of the best headlight restoration kits I’ve used. The instructions were simple, the process was easy to follow, and the results were way better than expected. My headlights were heavily oxidized and yellow, and after using the 2000/3000 grit sanding steps with the ceramic coating, they looked almost brand new again. The ceramic finish made them crystal clear and glossy. Definitely worth the money and much better than cheap polish-only kits.
WAS THIS REVIEW HELPFUL?YesReportShare
Reviewed in the United States on May 22, 2026
C
Verified Purchase
cwin
Charlottesville, US
★★★★★ 5
Very happy with the outcome, worked perfectly
Size: 1 Count (Pack of 1)
I was very happy with the CERAKOTE Ceramic Headlight Restoration Kit. The instructions were simple to follow, and the whole process was much easier than I expected. My headlights were cloudy and dull before using it, but after completing the steps, they looked dramatically clearer and much closer to new. The kit included everything needed, and I liked that it did not require any extra tools or complicated equipment. The results made a noticeable difference in the appearance of the vehicle, and the headlights also seem brighter at night. Overall, this is a great product that does exactly what it claims. I would definitely recommend it to anyone looking for an affordable and effective way to restore foggy headlights.
WAS THIS REVIEW HELPFUL?YesReportShare
Reviewed in the United States on May 25, 2026
G
Verified Purchase
Gabrila
Boise, US
★★★★★ 5
Highly Recommend – Amazing Results on My Honda Accords!
Size: 1 Count (Pack of 1), Size: 1 Count (Pack of 1)
I recently used the Cerakote Headlight Restoration Kit on both my 2008 and 2014 Honda Accords, and I’m genuinely impressed. The headlights on both cars were badly oxidized, hazy, and yellowed from years of sun exposure. After following the kit’s instructions, they look crystal clear and almost like new again. The process is pretty straightforward and beginner-friendly. It does take roughly an hour per headlight set if you follow all the steps carefully and allow proper air drying time before the final clear coat. There’s a bit of elbow grease involved with the sanding and polishing stages, but nothing overly difficult. The kit provides everything you need, and the instructions are clear. The results are excellent! Both cars now have headlights that look factory-fresh. I’m really happy with how bright and clear they are at night. Best part? I saved a ton of money by restoring them instead of buying expensive OEM replacements. The only minor uncertainty is long-term durability (how well the clear coat holds up after a couple years of sun, weather, and car washes), but for the price and the dramatic improvement I saw, it’s absolutely worth it. I’d definitely buy this kit again if needed. Highly recommended for anyone dealing with cloudy headlights. Great product that delivers professional-looking results at a fraction of the cost!
WAS THIS REVIEW HELPFUL?YesReportShare
Reviewed in the United States on May 3, 2026
C
Verified Purchase
Cleaver
Lowell, US
★★★★★ 4
Best product I've tried so far but still temporary. YMMV.
Size: 1 Count (Pack of 1)
This product really does work. It is the best I've used. I purchased in September 2024 and am writing this review in May of 2026, roughly one year and 8 months later. I noticed product failure a little after a year after application and it has been degrading slowly since. Currently the product is visible like a layer of clear paint flaking off and you can physically scratch some off. Here are the pros and cons. Pros: Clarity, relative ease of use, value Cons: Taping and sanding, doesn't last for as long as you own your car as claimed Best used as a temporary fix. Bottom line, would I use it again? Yes. What am I doing today? Replacing the headlights completely. Why? I plan on keeping my car for longer than a year.
WAS THIS REVIEW HELPFUL?YesReportShare
Reviewed in the United States on May 8, 2026
S
Verified Purchase
Sahiti
Alexandria, US
★★★★★ 5
Review After Using on 3 Different Cars over 3 years
Size: 1 Count (Pack of 1)
Cerakote Headlight Restoration Kit : After Using on 3 Different Cars over 3 years This is my second time purchasing the Cerakote Headlight Restoration Kit, and I’ve now used it across three different vehicles. At this point, I feel comfortable saying this product genuinely works when used correctly. Before trying this kit, I considered replacing my headlights entirely. The cheapest replacement set I found was around $150 just for the parts. Installation would have required removing the grille, bumper, and other components, which adds time and complexity. For an older vehicle, that didn’t make financial sense. Instead, I chose to restore the original headlights. Cost and Value My first package cost me $17, and I restored two cars with that single kit ( about 9$ per pair). That alone made it worth it. For under $20: I restored two separate vehicles Avoided buying new headlight assemblies Avoided removing the bumper and grille Compared to a $150+ replacement plus labor, the savings are significant. Durability 1 year+ under direct Cali sunlight (currently on year 2 and still good) First Car – Learning the Process The first time I used the kit, my results were decent but not perfect. That was mainly because I didn’t fully understand how sanding and polishing actually work. ( this reoxidized fastest under 8 months, but it was mostly my fault) I didn’t initially realize: The headlight needs to stay wet during sanding Oxidation must be completely removed before applying clear coat Even pressure matters/ 50% overlap coverage when appling ceramic Once I understood that sanding is the most important step, everything improved. Second Car (beater) Major Improvement The second vehicle was heavily oxidized and yellowed. I used the remaining material from that same $17 kit and restored it completely. The clarity difference was dramatic. It looked close to factory condition, and night visibility noticeably improved. That was when I realized the product itself is solid; the key is proper technique. Third Car ; Recent purchase By the third car, the process felt straightforward. I followed the instructions carefully, kept the surface wet while sanding, and applied the clear coat evenly in one smooth pass. The final result was clear, glossy, and uniform. No haze, no streaking. Durability On my first vehicle, the restoration lasted close to a year perfectly( I sold that car this year and it still had clear headlights), and that car was parked outside in direct sun most days. For a DIY kit at this price point, that level of durability is impressive. Final Thoughts I seriously considered spending $150 on replacement headlights( this was cheapest ) and dealing with removing body panels. Instead, I spent $17 and restored two cars. Now having used it on three vehicles, I can say this kit is effective, cost-efficient, and worth the time if you follow the process properly. It does require effort and patience, but the results justify it. I would purchase it again.
WAS THIS REVIEW HELPFUL?YesReportShare
Reviewed in the United States on February 18, 2026

recommand products